
React Native DevOps made easy. Part 2. iOS
Updated on
After a 2 months delay we continue with a journey to address the issue of a transparent and efficient deployment pipeline of React Native application. In the previous chapter React Native DevOps made easy. Part 1. Android we have covered Android and PlayMarket ecosystem and now it's time to finish the configuration from iOS side. If you haven't read previous chapter you can get back to it later since it's a self-contained tutorial with the general parts covered.
At StartupCraft Inc we love spending days in research and development of the infrastructure that would pay off in a long run. Call it a smart time investment, we just prefer creating a configuration once and reuse it in future.
What else do we need? CI (Continuous Integration), so that we can run tests before each build and maintain different environment variables. And the way to automate the initiation of the build process. There are a few options on the market to help with this goal and we stopped on the most sophisticated one in our opinion - BitRise.
In order to proceed you need to have an Apple Developer account first.
Step 1. Setup a BitRise account
If you haven't read the previous chapter - go ahead and create the new BitRise account at https://www.bitrise.io/ Standard procedure. Once you're done - you should see an empty dashboard:

Next, we're going to create an iOS app. While BitRise offers a single app in their platform to support both platforms, we found it messy and since we're also dealing with CI flow process is handled separately.
Step 2. Build Flow
To help understand the process better, we have visualized process using the schema below:

Click on “Add your first app” and begin with the project setup wizard.
1. Select an account to which project should belong to and its privacy settings. You can select "Public" in the sake of simplicity of this tutorial as we don't mind these configs to be publicly accessible.

2. Link to your GitHub account and select project repository from the list.

3. Unless you have public repository, private SSH key will be generated at this point. Otherwise, skip this step.

Private key will be added to the GitHub "Deploy Keys" section under the project settings.

4. Time to specify branch of repository to use "master" by default.
After confirming the branch, BitRise will validate the information. This process takes time so you can brew a cup of coffee or tea in the meanwhile.

Next, we'll go through "Manual" process of the project installation.
5. If the "Manual" mode is selected and the configuration looks like the one on the screenshot below, it means the iOS configuration is selected by default.

Click "Next" and then "Confirm" to proceed. Next step will be Webhooks setup. This feature allows us automatically rebuild the app based on a certain set of actions such as commit pushes, pull requests etc. What are you waiting for? Hit “Register a Webhook for me!” and jump to the next step!

Step 3. Webhooks setup
After the successful completion of the wizard, BitRise will automatically start first build for the newly created app. Don’t worry, it will always fail for the first build as we still need to tune it using workflow builder

Following the best security practices, we don't hardcode or store any kind of sensitive information inside our code or repository. In order to connect this sensitive data and not to get exposed, use appropriate keys which are going to be used later as environment variables, integrated within the build process as well as signing IPA file in a secure fashion during archive generation stage.
In addition to uploading environment variables file, we also have to upload provisioning profiles and code signing identities. BitRise offers a file storage outside of the box and we are gonna upload files associated with appropriate environment type: staging, production etc. Switch to "Code Signing" section to proceed.

Environment Variables setup
Each file uploaded within this section will be associated with the file path accessible through respective environment variable. Let's test it via uploading respective files for production and staging environments. “.env” is used for production and “.env.dev” is used for staging.
First of all, you need to specify a name of the file to upload, for example, we use “ENVFILE” and “ENVFILE_DEV”. Once you have them, simply upload files by clicking on the dropzone area or drag and drop over it.

The next files to be uploaded are the provisioning profiles. You need to download them first from Apple Developer account. After you upload all your provisioning profiles they should appear in BitRise like on the screenshot below.

Following the message complaining that we haven't uploaded all required certificates let's repeat the exercise which is pretty much similar to what we had in previous step. The only difference this time is to download certificates instead of provisioning profiles, you can also grab them from Apple Developer account. After uploading them, don't forget to specify a password in a relevant column if you haven’t set it during certificate generation step. The result should look similar to the following screenshot:

Secrets
Now when all files are accessible throughout the building process, our next step is to configure secret environment variables so we don't expose them in vulnerable places such as source code or BitRise config. Navigate to "Secrets" tab to proceed.

From the screenshot above you can see how we have specified AppStore Connect credentials alongside with meta information for both staging and production environments. They will later be used in the workflow.
BitRise configuration setup
Let’s switch to “bitrise.yml” tab and replace all content there with the config below.
bitrise.yml


---
format_version: '3'
default_step_lib_source: https://github.com/bitrise-io/bitrise-steplib.git
project_type: ios
workflows:
  _init_install:
    steps:
    - activate-ssh-key@4.0.3:
        title: Activate App SSH key
        run_if: '{{getenv "SSH_RSA_PRIVATE_KEY" | ne ""}}'
    - git-clone@4.0.14: {}
    - yarn@0.0.8:
        inputs:
        - command: install
  _xcode_archive:
    steps:
    - certificate-and-profile-installer: {}
    - set-ios-info-plist-unified@1.1.6:
        inputs:
        - bundle_version_short: ''
        - bundle_version: "$BITRISE_BUILD_NUMBER"
        - info_plist_file: "$BITRISE_INFO_PLIST_PATH"
    - file-downloader:
        inputs:
        - destination: "$ENVFILE_DESTINATION"
        - source: "$ENVFILE_URL"
    - xcode-archive:
        inputs:
        - team_id: ''
        - configuration: ''
        - force_team_id: ''
        - force_provisioning_profile_specifier: ''
        - force_provisioning_profile: ''
        - is_clean_build: 'yes'
        - output_tool: xcodebuild
        - is_export_xcarchive_zip: 'yes'
        - export_method: app-store
        - custom_export_options_plist_content: ''
    - deploy-to-itunesconnect-deliver@2.15.0:
        inputs:
        - itunescon_user: "$APPSTORE_CONNECT_USER"
        - password: "$APPSTORE_CONNECT_PASSWORD"
        - app_id: "$APPSTORE_CONNECT_APP_ID"
        - bundle_id: "$APPSTORE_CONNECT_BUNDLE_ID"
    - deploy-to-bitrise-io:
        run_if: false
        is_always_run: false
        inputs:
        - notify_user_groups: none
    envs:
    - opts:
        is_expand: true
      BITRISE_PROJECT_PATH: ios/Synchronic.xcodeproj
    - BITRISE_INFO_PLIST_PATH: ios/Synchronic/Info.plist
  _slack_message:
    steps:
    - slack:
        inputs:
        - webhook_url: "$SLACK_WEBHOOK_URL"
        - channel: "#bitrise"
        - from_username: iOS $ENVIRONMENT Build Succeeded
        - from_username_on_error: iOS $ENVIRONMENT Build Failed
        - emoji: ":confetti_ball:"
        - emoji_on_error: ":shrug:"
  development:
    steps:
    - script:
        title: Set Environment
        inputs:
        - content: |-
            #!/bin/bash

            envman add --key ENVFILE --value .env.dev
            envman add --key ENVFILE_DESTINATION --value ".env.dev"
            envman add --key ENVFILE_URL --value "$BITRISEIO_ENVFILE_DEV_URL"
            envman add --key BITRISE_SCHEME --value "Development"
            envman add --key ENVIRONMENT --value "[STG] Synchronic"
            envman add --key APPSTORE_CONNECT_APP_ID --value "$APPSTORE_CONNECT_APP_ID_DEV"
            envman add --key APPSTORE_CONNECT_BUNDLE_ID --value "$APPSTORE_CONNECT_BUNDLE_ID_DEV"
    before_run:
    - _init_install
    after_run:
    - _xcode_archive
    - _slack_message
  production:
    steps:
    - script:
        title: Set Environment
        inputs:
        - content: |-
            #!/bin/bash

            envman add --key ENVFILE --value .env
            envman add --key ENVFILE_DESTINATION --value ".env"
            envman add --key ENVFILE_URL --value "$BITRISEIO_ENVFILE_URL"
            envman add --key BITRISE_SCHEME --value "Production"
            envman add --key ENVIRONMENT --value "[PRD] Synchronic"
            envman add --key APPSTORE_CONNECT_APP_ID --value "$APPSTORE_CONNECT_APP_PRD_ID"
            envman add --key APPSTORE_CONNECT_BUNDLE_ID --value "$APPSTORE_CONNECT_BUNDLE_ID_PRD"
    before_run:
    - _init_install
    after_run:
    - _xcode_archive
    - _slack_message
trigger_map:
- push_branch: production
  workflow: production
- push_branch: master
  workflow: development
- push_branch: bitrise
  workflow: development
Could look intense but as we dive into each workflow, the whole script can be split into self-contained tasks. To understand it better, let's review every workflow separately.
- development and production:
High-level workflows. They serve as setters for the global variables for respective environment defined by their name. Here we specify “env” file destination path, name of the schema, AppStore Connect credentials and other variables associated with the environment.
- _init_install:
This workflow is used within the build preparation stage. It encompasses steps like downloading codebase and installing yarn dependencies.
- _xcode_archive:
XCode archive workflow does run several processes:
- Installs respective certificates, uploaded earlier above
- Bumps iOS project version and assigns BitRise-generated build number
- Downloads “env” file from the file storage
- Produces and sign IPA file using environment variables specified earlier above
- Finally, it deploys fresh build file to AppStore Connect alongside with security credentials. This build is also pushed to the BitRise file storage where you can retrieve meta information directly from the Bitrise public installation page.
-
_slack_message:
This is a bonus hook which serves as a notifier, broadcasting updates in a specified Slack channel about the build results.
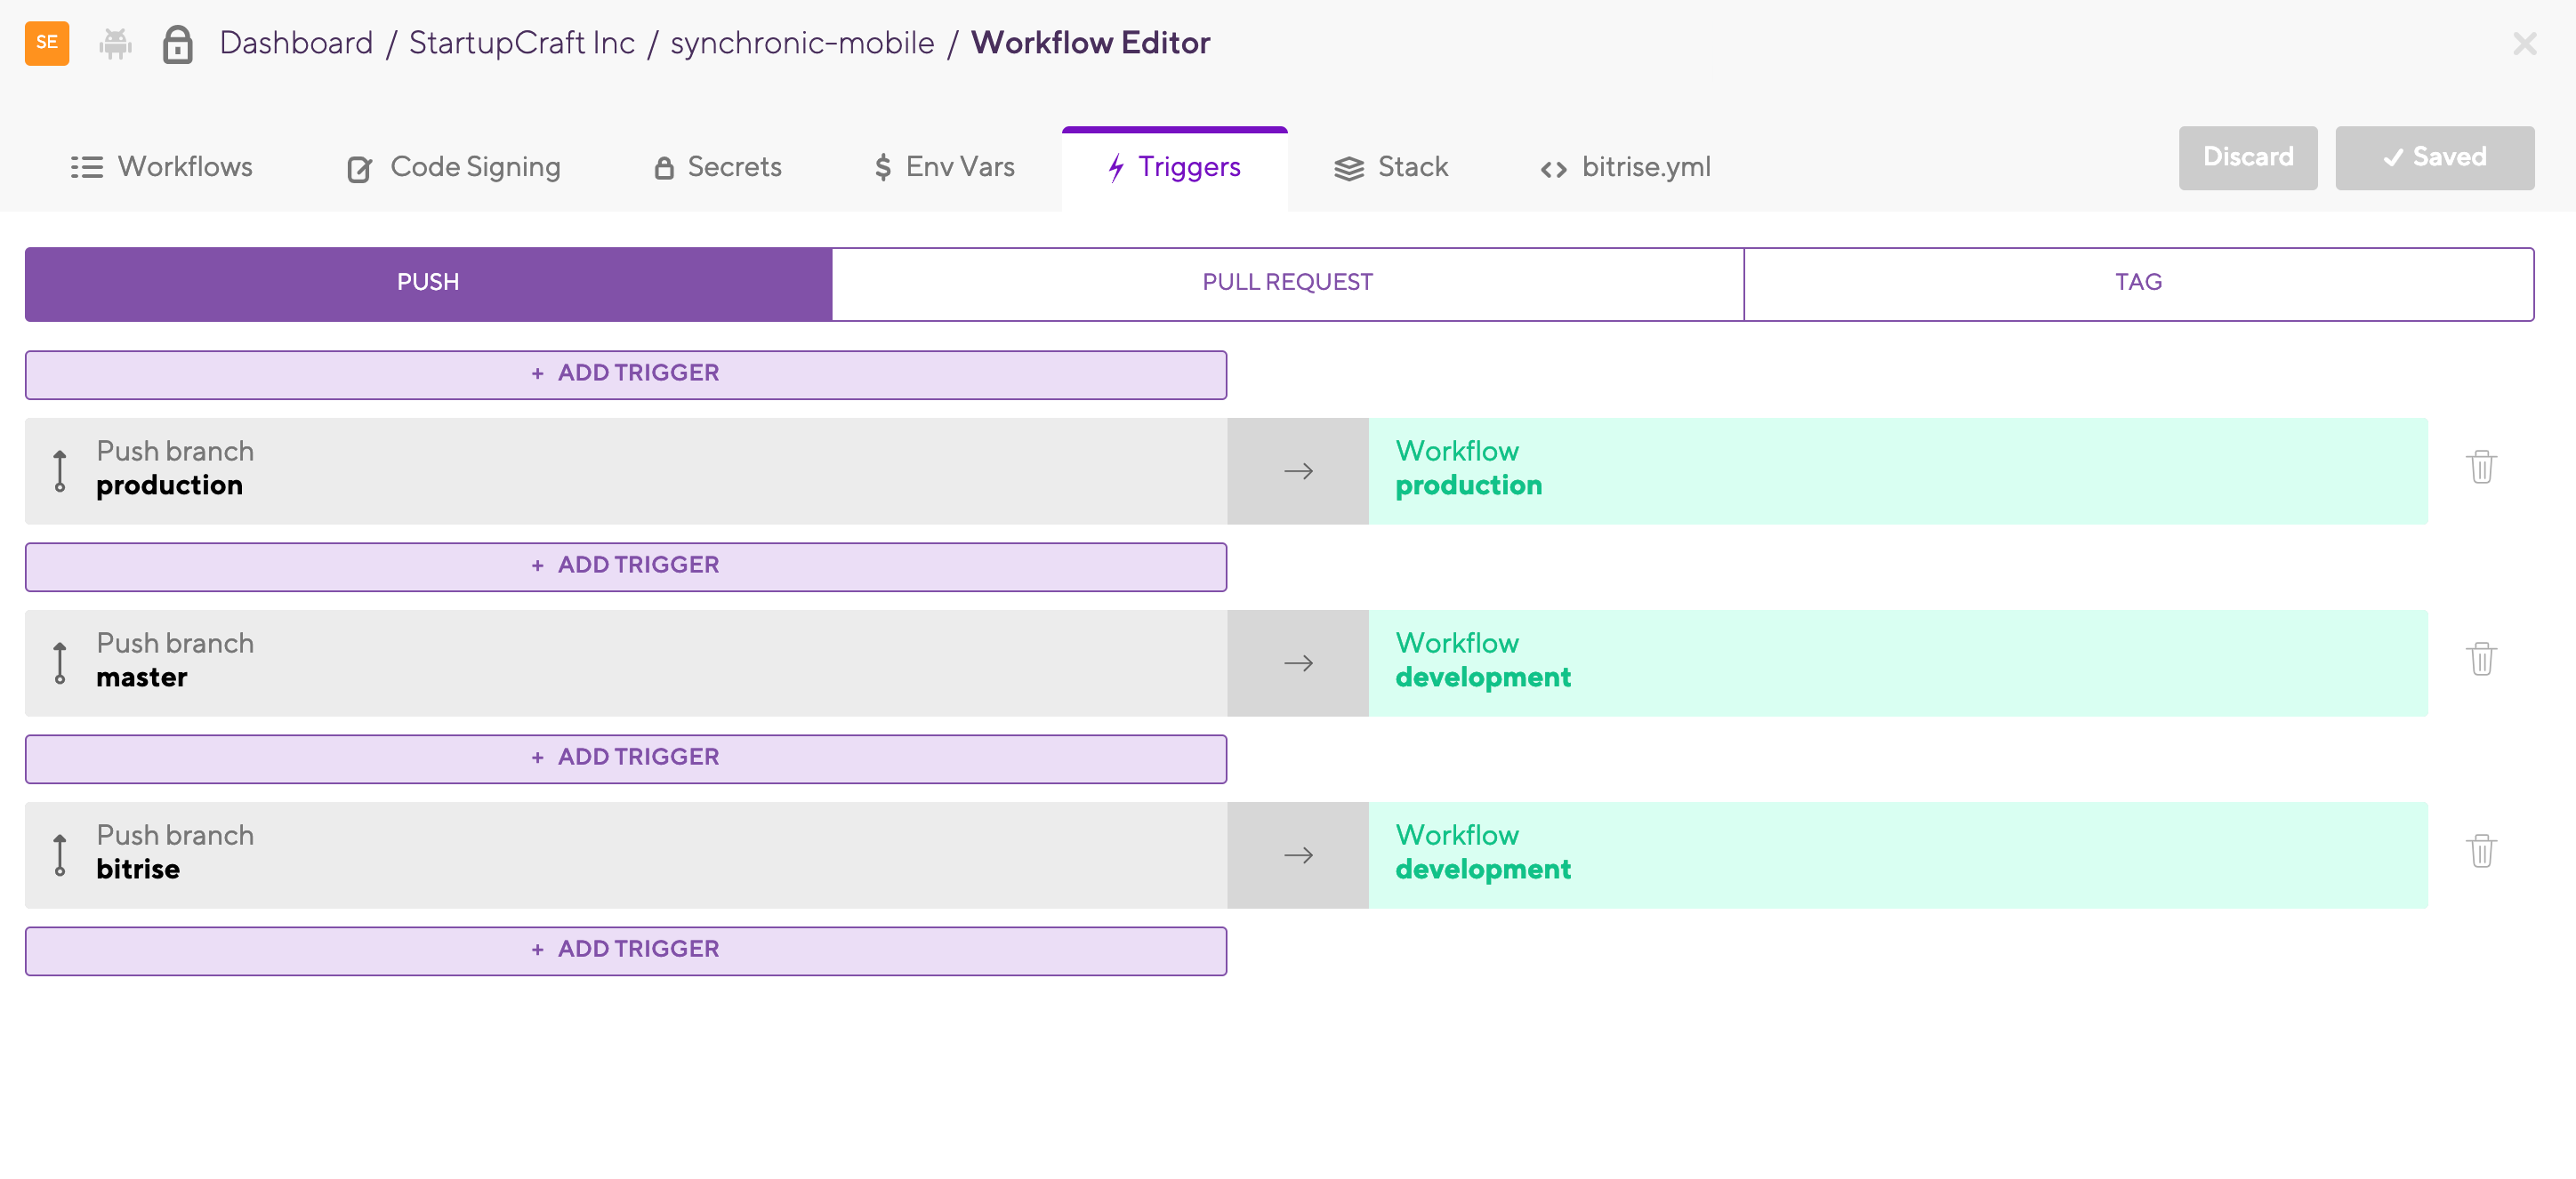
- trigger_map:
This handy tool lets us observe changes from code repository by mapping git branch name with workflow name. For instance, at StartupCraft we run production (or development) workflow anytime new commit is pushed to production (or master) branch. The map could be specified on the tab called "Triggers".

Step 4. Slack and GitHub Incoming Webhooks
This is it. This exact step is repeating the same instructions set in the previous chapter. Since we have originally planned to make tutorial independent - we simply copy-paste it here. If you finished React Native DevOps made easy. Part 1. Android you can skip most of the steps. Otherwise, let's go!
GitHub
Select “Code” tab in Workflow editor and select “Setup manually” in the “Incoming Webhooks” section.

In the dropdown menu, GitHub should be already selected by default. You just need to copy the webhook URL.

And time to travel to GitHub. Visit repo’s settings page and select “Webhooks” tab and click “Add webhook” button.

Now paste copied url into the “Payload URL” field and click on “Add webhook”. That's it! When new commits are pushed to the branches mapped with workflow you have specified in the “Triggers” section, respective workflow will get triggered.

Slack
Not necessary yet extremely convenient webhook. Repeat the process from the Code section but select “Slack” from the apps dropdown instead of GitHub and copy suggested URL. And move to "Slack" app.
Inside the application, click on “Add apps” in the left bottom corner like on screenshot below.

Once you're done, “Browse Apps” screen will appear. You need to install application called “Incoming WebHooks”.

On the “Incoming WebHooks” configuration page, select channel to which BitRise build results should be broadcasted to. We use “bitrise” channel name according to our bitrise.yml configuration. If you want to use different channel name don't forget to update bitrise.yml.

After clicking “Add Incoming WebHooks integration” you will receive the WebHook URL.

Copy and paste URL into the Secret variable field in the Bitrise “Secrets” section of the workflow builder.

Conclusion
Congratulations! At this point you have a BitRise build pipeline ready for iOS and Android application going into distributed development process for staging and production environments.
To summarize what we have:
- a fully configured system for deploying iOS and Android applications for staging and production environments.
- integrated continuous integration process.
- convenient webhooks which automate deployment process and keep everybody in a loop inside a Slack channel for both apps.
It was hard for us to wrap-up everything, given our crazy schedule at StartupCraft Inc, and now we are proud of sharing this final piece of blueprint. Hope you have enjoyed it and if you like it - please share a comment or give us kudos.
The whole approach was developed by Sergey Laptev and successfully tested in production environment. Such a solution is literally transforming an article into a recipe which we are going to reuse internally. In this particular example we have used configs for our first internal application with a codename "Synchronic". More on what it does you will hear from us in our future articles.
Our primary goal in the Blog is to continue sharing our knowledge in both technical and productivity areas.
Stay tuned and subscribe! And thank you for taking time reading this article!
0/5

Article by:
Volodymyr Katanskyi
CEO at StartupCraft Inc
Volodymyr has over 12 years of experience in software development and has studied Engineering and Multicultural Education. While travelling around the world, he invented the adaptive workflow framework that helped manage a team of around 100 team members alone, stay productive and scale. This knowledge was incorporated in a form of StartupCraft Inc company.

Idea by:
Sergey Laptev
CIO at StartupCraft Inc
Sergey is a mobile applications expert, system architect and CIO at StartupCraft Inc. Sergey has been living with code in mind for the past 9 years. He holds a degree in Applied Informatics and Software Engineering. His main focus lies in mobile applications as he is a React Native guru. He constantly improves his skills experimenting with bleeding edge technologies, architecture patterns and always follows the latest trends.